Before weaving onions in braids, familiarize yourself with the basic weaving techniques, because the quality of the created “structure”, the duration of its operation and the safety of the vegetable depend on it. Due to this, onions do not lose useful properties, do not rot, leaves taste and aromatic qualities. Equally important is the convenience of removing each onion.

Why weave braids from a bow?
You can put the tubers in a box, but it’s difficult to keep the onion. Why exactly braids? The reasons for the need for weaving are as follows:
- Provides free air circulation, which increases the shelf life. Without proper ventilation, the bulbs undergo mold and rot, as moisture affects them.
- Saves space in the storage room (braids are suspended).
- Signs of diseases are detected in a timely manner, because access to each root crop is open. As a result of this, the spread of infection to other units can be stopped.
- Avoiding eating the vegetable by rodents and insects living in the outdoor area.
- The ability to move the braids to another place.
- Preservation of aroma and taste, nutrients.
- There is no need to carry out antiseptic treatment of the premises, since onions secrete volatile, suppressing pathogens.
- You can create a unique interior design in a rustic style.
- Quick access to the product.
- Saving money - the crop is fully preserved, you do not need to purchase additional containers.
Optimum time for weaving
The onion crop is harvested in July-August, therefore, braids can be braided in this period, but after the roots are thoroughly dried. It takes about 2 weeks. However, in braids, the onion also dries out, so depending on the method chosen, weaving can begin 3 days after harvesting.
The exact period can be precisely determined based on the maturity of the tubers, as evidenced by the following indicators:
- leaves become yellow and dried out;
- the bulbous necks are thinning and softening;
- the husk acquires a yellow color;
- scales easily removed from the bulb;
- fruits gain juiciness, crunchiness, aroma and taste.
Sometimes it is impossible to determine the harvest time, respectively, and braid weaving, as the bulbs turn yellow unevenly. But there is a main symptom - lodging of the stems, even if they are still green.
Bulb preparation
To keep the bulbs in the braids as long as possible, they need to be properly not only weaved, but also assembled and prepared. What is included in these events:
- Harvesting is best done in the morning, after the appearance of the sun.
- You can not pull out the tubers - they are damaged from the inside. How to remove from the soil: dig up the soil with a shovel, carefully pull the onion.
- Shake off the remaining soil from root crops, but do not hit the heads against each other. Otherwise, the bulbs will begin to rot.
- Spread the tubers in the garden or in the drying room. The first option is preferable, since the onion should dry in the sun. Place woven material under the vegetables under the air - they will remain clean and will “breathe” from all sides. Why exactly under the sun? The answer is simple - the heat emitted by the rays helps to disinfect and quickly dry naturally.
- Do not cut off the feathers immediately, as tails will be needed for weaving. Their length should be at least 15-20 cm.
- Do not leave root crops on the street at night - it is better to bring them into the room or cover with foil. This is necessary so that morning dew does not saturate them with moisture.
- Before braid weaving, the bulbs are freed from the husk, which is easily removed, but do not allow the complete removal of the scales.
- Be sure to wipe each vegetable with a soft and dry cloth.
- Calibrate the bulbs (take the whole fruits without damage, fully ripened).
- For braids, select turnips of the same size.
- Do not overdry the tops - it should be elastic.
Weaving Methods
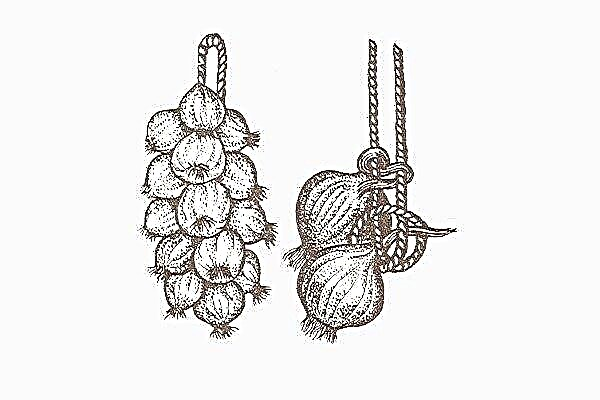
There are a lot of methods for weaving braids from bulb crops, so gardeners can choose the most convenient and optimal for themselves. The standard generally accepted principle of weaving is shown in the photo:

Method number 1:
- take bulbs with long tops;
- select the largest vegetable that will become the basis;
- attach one more root crop to it on the left side, crossing the processes (the tail of the base lies directly, the tops of the bulb on the left have the opposite direction);
- on the right side do the same;
- weave to the required length (no more than 2 m), applying new bulbs each time;
- at the bottom, fix the tops with a rope, making any knot.

If the feathers are not long enough, use a rope that is attached to the greenery and woven together with the tops. Remember that the ends of the twine should be flat and the same, the density of weaving is maximum. At the end, tie a loop on which the bow will hang. You can do this this way:
- You will need 3 cords of the same length. Tie them together at the top.
- Attach the onion to one of the ropes at the top and make a strong knot.
- Apply tubers to the other 2 ends, but do not tie to the rope, but start three-strand weaving, as in the previous method. This will result in a compacted bundle.
Method number 2:
- Fold the long rope in half. Make a loop at the bend, and knot the ends at the bottom.
- Insert the process of the large bulb into the loop, tighten it firmly.
- Next, alternately apply the tails of the bulbs to one rope, then to the other as a horizontal figure eight. Hold the top of the tops with your fingers, pass it between the rope ring.
- Weave the rest of the bulbs in this way. In the common braid remain the tops of the tops, which can be cut with ordinary scissors.


Method number 3:
- Fold in half a long twine, making a loop into which skip the tops from one bow. It should turn out 3 strands - one of the feathers (located in the middle), two of the ropes.
- With each step of weaving, add one root crop, weaving them into the side strands (rope and onion).
- Having reached the end (the length of the string is 10 cm), make a knot.

Method number 4:
- Fasten between each of 2-3 bulbs in any way, but the integrity of the tops must not be compromised.
- Fold the rope in half and loop around the feathers of the first pair of vegetables.
- Spread the remaining pairs on opposite sides of the twine so that when weaving the bulbs unfold in diametrically opposite directions.
- After weaving each pair on a rope, make a knot, fixing the braid.
- At the bottom, fix the structure.
The result is a very dense braid. Remove the remaining tops with scissors.
If you plan to use onion braids as a decorative element, weave in them dead flowers, spikelets and other "accessories" that match the interior design.

One of the ways weaving onions into braids is clearly shown in the video below:
Important Nuances
Regardless of the chosen method of weaving braids from onions, it is necessary to adhere to the general rules, so that the bunch will not crumble, and the bulbs will be fixed securely.
8 useful recommendations:
- Follow the rules for preparing bulbs before weaving - the duration of storage depends on this.
- Try to leave the feathers as long as possible, as it is more convenient to work with them, and the weaving becomes more durable.
- For braids, you can use not only the feather part, but also the arrows. Although they are considered less elastic.
- For convenience, while weaving, hang the future braid on a nail / hook. But to make the "structure" hardened, it is better to lay the bulbs on the table surface.
- If you braid without a rope, do not make too long knits, as the bulbs are heavy. Consequently, the braid will burst under its own weight.
- Among the ropes, give preference to reinforcing fibers, that is, those species that are not slippery, therefore they reliably hold knitwear. This is twine, bandage, cord.
- If you braid the braid, but it was not so strong, bind it right away until the tops are dry.
- Do not be afraid to weave more green feathers - they will dry in a braid, but the knit will be more reliable.
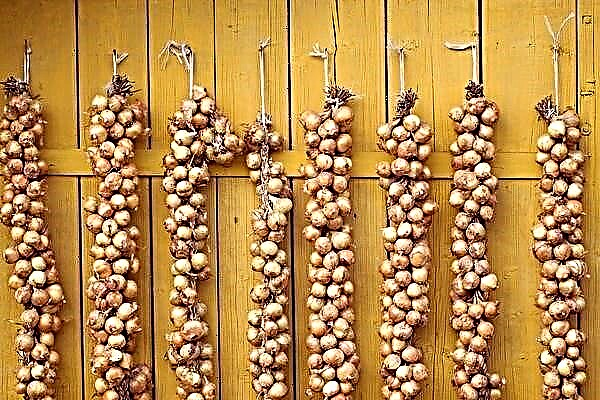
How to store onion braids?
To keep the bulbs in the spit for at least six months, create optimal storage conditions. What is recommended by experts and experienced gardeners:
- The room should be dry - humidity level up to 70%. If you do not adhere to this requirement, the root crops will rot.
- Air temperature plays a crucial role. The best indicators are from +18 to +22 degrees, that is, room temperature, so use the kitchen, hallway, closet. You can not put bulbs in the cellar and basement.
- Braids require frequent ventilation. If you store bundles in a pantry, periodically remove them and keep them in a ventilated room overnight.
- Do not hang onions over heating appliances - this contributes to excessive drying.
- Once every 2-3 weeks, inspect the bulbous crops for rotten elements. If mold and rot is present, cut off the bulbs so that the rot does not spread, affecting other vegetables.
- With increased humidity, the bulbs sprout, so inspect the heads carefully.
- Before storage, it is advisable to slightly cut off the root system - so the bunch will look aesthetically pleasing.
- There is an opinion that in autumn and spring onion bundles require warmer storage conditions, and in winter the temperature drops by 5-7 degrees.
Having mastered the skill of weaving braids from onions, you will not only save vegetables for a long time, but also create special comfort in your home. Weaving knits is not difficult - just know the basic principle of weaving ordinary braids. Follow the instructions, follow the rules of preparation and storage and come up with new options for weaving yourself.
Posted by
2
Russia. City: Zheleznogorsk
Publications: 56 Comments: 0